Vue项目集成百度离线地图
工作中遇到了一个需求,要在内网使用百度地图,那么肯定就是离线的地图了,查阅了一些博文,开发过程中也遇到了各种各样的问题,在此做下记录,希望带大家避坑,也给自己这两天的开发做一下总结。
需求:
-
内网中使用百度地图
-
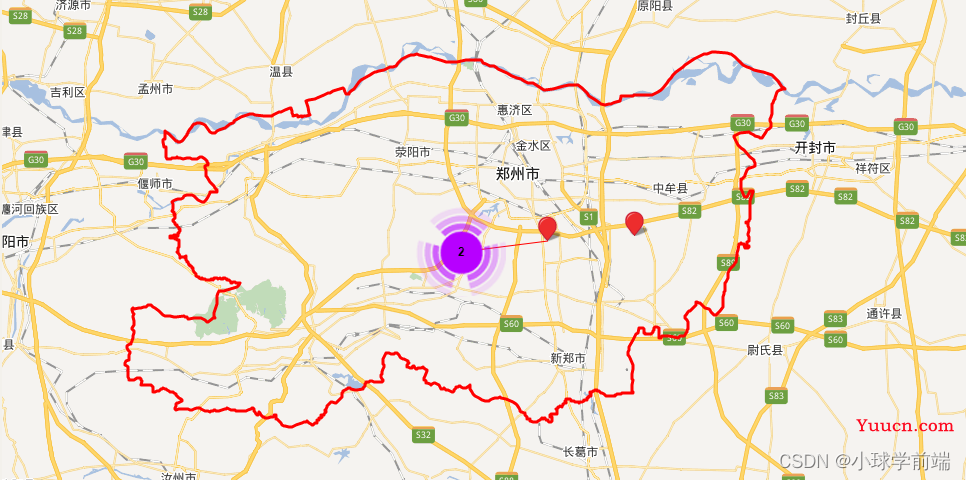
仅展示郑州市地图,并将郑州市地图轮廓圈出
-
支持绘制点
-
支持绘制线
-
支持多点聚合
技术栈
- Vue2
- BMap
效果图

开始
1、项目搭建
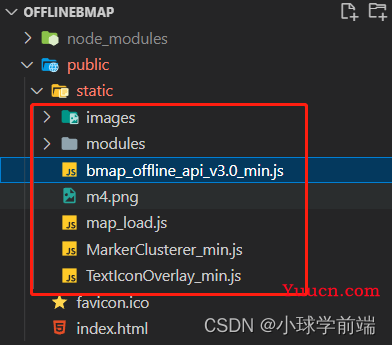
vue脚手架搭建不再赘述,默认此刻你已经创建好一个vue-cli项目,此时,在public文件夹下创建文件夹static,将我们所需要的资源放到这个文件夹里,文件后续有给出。注意路径,一定注意路径,踩坑很久,文件中路径已经改好。
2、文件说明及避坑大法
- images:地图中图标,例如:树、建筑物等
- modules: 所需要的js模块
- bmap_offline_api_v3.0.min.js: 创建地图,包含各种地图上操作的api等
- m4.png: 聚合图标,上图中的紫色图(可根据项目风格进行替换)
- map_load.js: 初始化一些全局变量,包括文件路径,瓦片图加载路径,动态加载bmap_offline_api_v3.0.min.js文件等
- MarkerClusterer_min.js: 实现点聚合
- TextIconOverlay_min.js: 点聚合相关

修改直通车:
1、瓦片图路径处理
map_load.js,在网上看博主写的配置有tiles_dir,但是没有tiles_path,就意味着只能将瓦片图放置到自己项目中,图片有很多很多,vue项目直接编译崩溃,所以为了开发方便,我们还是将瓦片图放置到服务器中,我们这边做引入即可。在tiles_path中进行配置服务器地址。
踩坑1:注意:一定不要只对照map_laod.js来配置自己的js,一定要看bmap_offline_api_v3.0.js中瓦片地址的配置方法
let bmapcfg = {
  'imgext'      : '.png',   //瓦片图后缀
  'tiles_dir'   : 'tiles',  //瓦片图文件夹
  'tiles_path'  : 'http://localhost:5000/', //如果在服务器上,需要配置服务器地址
  'tiles_hybrid': '',
  'tiles_self'  : ''
};
对应bmap_offline_api_v3.0.js中模块加载代码,注意:你的可能跟我的不一样,一定要跟map_load.js进行对应。
 var tdir =
 bmapcfg.tiles_path ? (bmapcfg.tiles_path + bmapcfg.tiles_dir) : bmapcfg.tiles_dir
 return tdir + '/' + b + '/' + e + '/' + a + bmapcfg.imgext // 使用本地的瓦片
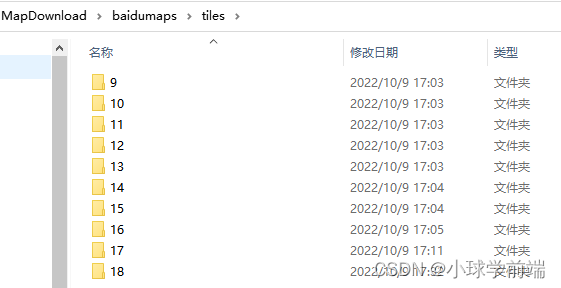
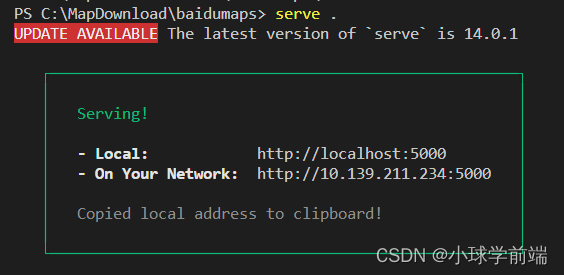
当然了,开发阶段我们可以先将瓦片图下载到本地,新建文件夹 dirName,

然后在对应文件夹中使用:serve 你的文件夹名开启本地服务,此刻,图片也可以用链接地址进行访问了

此刻配置我们的瓦片路径:
let bmapcfg = {
  'imgext'      : '.png',   //瓦片图后缀
  'tiles_dir'   : 'tiles',       //普通瓦片图的地址,为空默认在 offlinemap/tiles/ 目录
  'tiles_path'  : 'http://localhost:5000/',
  ...
};
2、模块加载路径配置
bmap_offline_api_v3.0.js
我们的模块地址放置在 modules文件夹下,所以配置如下:
// 修改 加载本地模块文件,在 modules 目录下
console.log(a) //打印所需模块
if (a.length > 0) {
    for (i = 0; i < a.length; i++) {
        mf = bmapcfg.home + 'modules/' + a[i] + '.js'
        oa(mf)
    }
} else {
	f.kL()
}
3、地图加载不出来
注意:瓦片图路径出错会导致地图加载出错。一定要看配置路径,js加载不到也是路径问题,路径问题!!!!
3、地图搭建准备工作
1、容器
跟平时一样,准备一个地图容器,设置容器大小
<template>
  <div class="home">
    <div id="container"></div>
  </div>
</template>
<script>
    ....
</script>
<style lang="scss">
#container {
  height: 100vh;
  width: 100vw;
}
</style>
2、初始化
 data() {
    return {
      map: null,
      mapPoints: [],
      markerClusterer: [],
    }
  },
初始化地图
initMap() {
    let BMap = window.BMap
    this.map = new BMap.Map('container')
    console.dir(this.map)
    let point = new BMap.Point(113.5001, 34.60468) // 创建点坐标
    this.map.centerAndZoom(point, 10) // 初始化地图,设置中心点坐标和地图级别
    //添加地图类型控件
    this.map.setMinZoom(10)
    this.map.setMaxZoom(18)
    this.map.enableScrollWheelZoom(true) //开启鼠标滚轮缩放
    // 添加点
    this.addMarker()
    // 添加线
    this.addLine()
    // 添加郑州市的轮廓线
    this.addBorderLine()
},
3、添加点、添加点聚合
addMarker() {
      let BMap = window.BMap
      let BMapLib = window.BMapLib
      // 初始化要显示的点的坐标
      this.initPoints()
      let mapMarkers = []
      this.mapPoints.forEach((point) => {
        let marker = new BMap.Marker(point)
        mapMarkers.push(marker)
        this.map.addOverlay(marker)
      })
      let markerClusterer = new BMapLib.MarkerClusterer(this.map, {
        markers: mapMarkers,
        styles: [
          {
            url: './static/m4.png',
            size: new BMap.Size(90, 90),
          },
        ],
      })
      markerClusterer.setMinClusterSize(2)
      this.markerClusterer = markerClusterer
    },
    initPoints() {
      let BMap = window.BMap
      var point = new BMap.Point(113.5001, 34.60468) // 创建点坐标
      var point1 = new BMap.Point(113.6001, 34.61468) // 创建点坐标
      var point2 = new BMap.Point(113.7001, 34.62468) // 创建点坐标
      var point3 = new BMap.Point(113.9001, 34.63468) // 创建点坐标
      this.mapPoints.push(point)
      this.mapPoints.push(point1)
      this.mapPoints.push(point2)
      this.mapPoints.push(point3)
    },
4、添加线
addLine() {
      let BMap = window.BMap
      let point = new BMap.Point(113.5001, 34.60468) // 创建点坐标
      let point1 = new BMap.Point(113.7001, 34.62468) // 创建点坐标
      let polyline = new BMap.Polyline([point, point1], {
        strokeColor: 'red',
        strokeWeight: 1,
        strokeOpacity: 1,
      })
      this.map.addOverlay(polyline)
    },
5、绘制城市边缘
这个数据我们可以通过在线地图API进行获取,获取到以后将数据保存到文件line.js中,将文件放置项目src/data文件夹下,便于我们离线使用
let boundary = new BMap.Boundary()
boundary.get('郑州市', (rs) => {
// res: 郑州市边缘数据
})
添加边缘数据:
addBorderLine() {
    let BMap = window.BMap
    let pointArr = []
    dataLine.forEach((pointDetail) => {
        var point = new BMap.Point(pointDetail.lng, pointDetail.lat) // 创建点坐标
        pointArr.push(point)
    })
    let polyline = new BMap.Polyline(pointArr, {
        strokeColor: 'red',
        strokeWeight: 3,
        strokeOpacity: 1,
    })
    this.map.addOverlay(polyline)
}
奉上项目地址:https://gitee.com/shanghaipingzi/offlinebmap
瓦片图下载
提取百度网盘中文件,然后运行exe文件,选择要下载的层级及地区即可
百度网盘链接:https://pan.baidu.com/s/16sOJ9ws7HCgNH3EMf7Ejyg?pwd=0q0e
提取码:0q0e
有问题欢迎评论区留言
文章借鉴了一个博主离线地图的开源代码,博主是在纯html中进行开发的,我这边在此基础之上集成到了vue中,并添加了我们的需求实现,查看的链接太多了,如果有幸入了博主的法眼,私聊挂链接哈!再次感谢博主!