其他章节请看:
webgl 系列
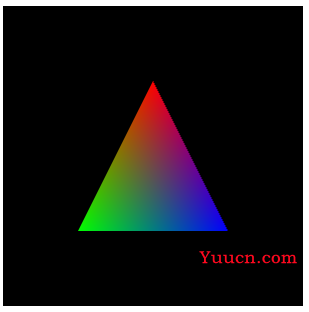
渐变三角形
本文通过一个渐变三角形的示例逐步分析:varying变量、合并缓冲区、图形装配、光栅化、varying 内插
绘制三个点v1
需求:绘制三个相同颜色的点,效果如下:
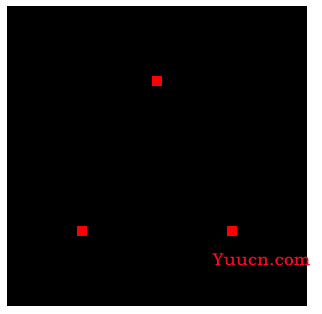
通过三角形的学习,这个需求非常容易实现。代码如下:
const VSHADER_SOURCE = `
attribute vec4 a_Position;
void main() {
  gl_Position = a_Position;
  gl_PointSize = 10.0;
}
`
const FSHADER_SOURCE = `
void main() {
  gl_FragColor = vec4(1.0, 0.0, 0.0, 1.0);
}
`
function main() {
    const canvas = document.getElementById('webgl');
    const gl = canvas.getContext("webgl");
    if (!gl) {
        console.log('Failed to get the rendering context for WebGL');
        return;
    }
    if (!initShaders(gl, VSHADER_SOURCE, FSHADER_SOURCE)) {
        console.log('Failed to intialize shaders.');
        return;
    }
    gl.clearColor(0, 0, 0, 1);
    gl.clear(gl.COLOR_BUFFER_BIT);
    const vertices = {
        data: new Float32Array([
            0.0, 0.5,
            -0.5, -0.5,
            0.5, -0.5
        ]),
        vertexNumber: 3,
        count: 2,
    }
    initVertexBuffers(gl, vertices)
    gl.drawArrays(gl.POINTS, 0, vertices.vertexNumber);
}
function initVertexBuffers(gl, {data, count}) {
    const vertexBuffer = gl.createBuffer();
    if (!vertexBuffer) {
        console.log('创建缓冲区对象失败');
        return -1;
    }
    gl.bindBuffer(gl.ARRAY_BUFFER, vertexBuffer);
    gl.bufferData(gl.ARRAY_BUFFER, data, gl.STATIC_DRAW);
    const a_Position = gl.getAttribLocation(gl.program, 'a_Position');
    if (a_Position < 0) {
        console.log('Failed to get the storage location of a_Position');
        return -1;
    }
    gl.vertexAttribPointer(a_Position, count, gl.FLOAT, false, 0, 0);
    gl.enableVertexAttribArray(a_Position);
}
绘制三个点v2
需求
需求:绘制三个不同颜色的点(基于版本1),效果如下:
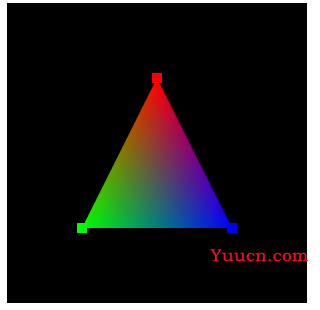
Tip: 绘制三个点不同颜色的点其实也就完成了渐变三角形的绘制。这里调用了两次 drawArrays(),也就是绘制了两个图元,一系列点、三角形。
核心代码
相对版本1,变化的代码如下:
 const VSHADER_SOURCE = `
 attribute vec4 a_Position;
+attribute vec4 a_Color;
+varying vec4 v_Color;
 void main() {
   gl_Position = a_Position;
-  gl_PointSize = 10.0;
+  gl_PointSize = 10.0;
+  v_Color = a_Color;
 }
 `
 const FSHADER_SOURCE = `
+precision mediump float;
+varying vec4 v_Color;
 void main() {
-  gl_FragColor = vec4(1.0, 0.0, 0.0, 1.0);
+  gl_FragColor = v_Color;
 }
 `
function main() {
     const vertices = {
         data: new Float32Array([
-            0.0, 0.5,
-            -0.5, -0.5,
-            0.5, -0.5
+            0.0,   0.5, 1.0, 0.0, 0.0,
+            -0.5, -0.5, 0.0, 1.0, 0.0,
+            0.5,  -0.5, 0.0, 0.0, 1.0,
         ]),
         vertexNumber: 3,
         count: 2,
     initVertexBuffers(gl, vertices)
     gl.drawArrays(gl.POINTS, 0, vertices.vertexNumber);
+    gl.drawArrays(gl.TRIANGLE_FAN, 0, vertices.vertexNumber);
 }
function initVertexBuffers(gl, {data, count}) {
     const vertexBuffer = gl.createBuffer();
-    gl.vertexAttribPointer(a_Position, count, gl.FLOAT, false, 0, 0);
+    const FSIZE = data.BYTES_PER_ELEMENT;
+    gl.vertexAttribPointer(a_Position, count, gl.FLOAT, false, FSIZE * 5, 0);
     gl.enableVertexAttribArray(a_Position);
+    const a_Color = gl.getAttribLocation(gl.program, 'a_Color');
+    if (a_Color < 0) {
+        console.log('Failed to get the storage location of a_Color');
+        return -1;
+    }
+    gl.vertexAttribPointer(a_Color, 3, gl.FLOAT, false, FSIZE * 5, FSIZE * 2);
+    gl.enableVertexAttribArray(a_Color);
 }
完整代码
const VSHADER_SOURCE = `
attribute vec4 a_Position;
attribute vec4 a_Color;
varying vec4 v_Color;
void main() {
  gl_Position = a_Position;
  gl_PointSize = 10.0;
  v_Color = a_Color;
}
`
const FSHADER_SOURCE = `
precision mediump float;
varying vec4 v_Color;
void main() {
  gl_FragColor = v_Color;
}
`
function main() {
    const canvas = document.getElementById('webgl');
    const gl = canvas.getContext("webgl");
    if (!gl) {
        console.log('Failed to get the rendering context for WebGL');
        return;
    }
    if (!initShaders(gl, VSHADER_SOURCE, FSHADER_SOURCE)) {
        console.log('Failed to intialize shaders.');
        return;
    }
    gl.clearColor(0, 0, 0, 1);
    gl.clear(gl.COLOR_BUFFER_BIT);
    const vertices = {
        data: new Float32Array([
            0.0,   0.5, 1.0, 0.0, 0.0,
            -0.5, -0.5, 0.0, 1.0, 0.0,
            0.5,  -0.5, 0.0, 0.0, 1.0,
        ]),
        vertexNumber: 3,
        count: 2,
    }
    initVertexBuffers(gl, vertices)
    gl.drawArrays(gl.POINTS, 0, vertices.vertexNumber);
    gl.drawArrays(gl.TRIANGLE_FAN, 0, vertices.vertexNumber);
}
function initVertexBuffers(gl, { data, count }) {
    const vertexBuffer = gl.createBuffer();
    if (!vertexBuffer) {
        console.log('创建缓冲区对象失败');
        return -1;
    }
    gl.bindBuffer(gl.ARRAY_BUFFER, vertexBuffer);
    gl.bufferData(gl.ARRAY_BUFFER, data, gl.STATIC_DRAW);
    const a_Position = gl.getAttribLocation(gl.program, 'a_Position');
    if (a_Position < 0) {
        console.log('Failed to get the storage location of a_Position');
        return -1;
    }
    const FSIZE = data.BYTES_PER_ELEMENT;
    gl.vertexAttribPointer(a_Position, count, gl.FLOAT, false, FSIZE * 5, 0);
    gl.enableVertexAttribArray(a_Position);
    const a_Color = gl.getAttribLocation(gl.program, 'a_Color');
    if (a_Color < 0) {
        console.log('Failed to get the storage location of a_Color');
        return -1;
    }
    gl.vertexAttribPointer(a_Color, 3, gl.FLOAT, false, FSIZE * 5, FSIZE * 2);
    gl.enableVertexAttribArray(a_Color);
}
改变颜色(varying)
前面我们说过着色器语言(GLSL ES)有三种类型的“变量”,我们已经使用了两种:
-
attribute- 传输的是那些与顶点相关的数据。只有顶点着色器才能使用。例如顶点的位置、大小、颜色 -
uniform- 传输的是那些对于所有顶点都相同的数据。例如变化矩阵
现在我们可以将颜色从 js 传入 attribute。但真正影响颜色绘制的是片元着色器的 gl_FragColor,目前我们是静态设置。就像这样:
const FSHADER_SOURCE = `
  void main() {
    gl_FragColor = vec4(1.0, 0.0, 0.0, 1.0);
  }
`
如何将顶点着色器中的数据传入片元着色器?
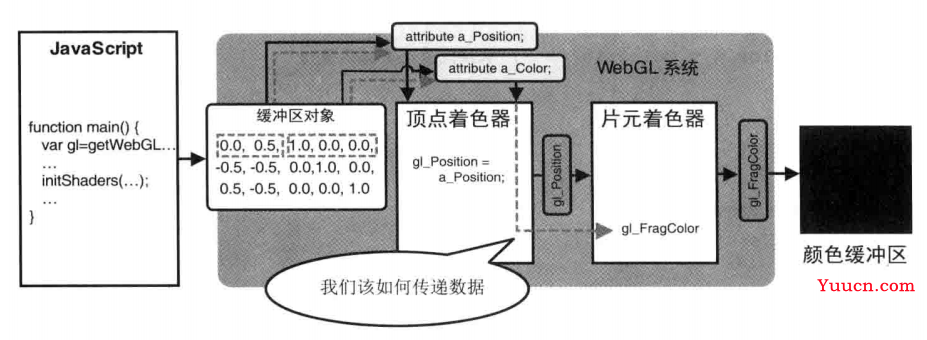
我们曾经通过 uniform 给片元着色器传递颜色。就像这样:
const FSHADER_SOURCE = `
uniform vec4 u_FragColor;
void main() {
  gl_FragColor = u_FragColor;
}
`
但是 uniform 是相同的的变量,没法为每个顶点准备一个值。为了让每个点的颜色不同,需要使用varying(不同的)变量。
使用 varying 给片元着色器传递值(颜色)。就像这样:
const VSHADER_SOURCE = `
// 定义一个 attribute 变量,用于接收 js 传入的颜色
attribute vec4 a_Color;
// 定义 varying 变量。用于传递给片元着色器
varying vec4 v_Color;
void main() {
  gl_Position = a_Position;
  gl_PointSize = 10.0;
  // 给 varying 变量赋值
  v_Color = a_Color;
}
`
const FSHADER_SOURCE = `
precision mediump float;
// 声明一个与顶点着色器中相同的 varying 变量名,用于接收颜色
varying vec4 v_Color;
void main() {
  gl_FragColor = v_Color;
}
`
代码解析:
- 通过在顶点着色器中声明一个 attribute 变量用于接收 js 传入的颜色
- 在顶点着色器中声明一个 varying 变量,用于接收 attribute 中的颜色,并将颜色传给片元着色器
- 片元着色器声明一个与顶点着色器中相同的 varying 变量名,接收颜色
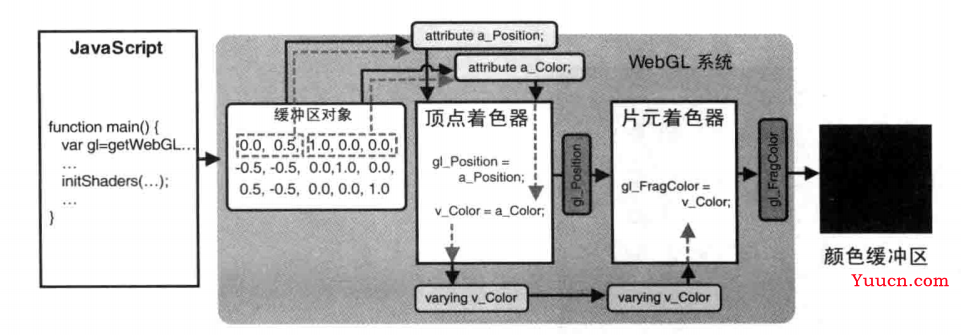
Tip:顶点着色器中的 varying 变量 v_Color 与 片元着色器中的 varying 变量 v_Color 不同。中间涉及 varying 内插,下文会介绍。
合并缓冲区
渐变三角形将顶点和每个顶点的颜色写在一起,数据结构如下:
         data: new Float32Array([
-            0.0, 0.5,
-            -0.5, -0.5,
-            0.5, -0.5
+            0.0,   0.5, 1.0, 0.0, 0.0,
+            -0.5, -0.5, 0.0, 1.0, 0.0,
+            0.5,  -0.5, 0.0, 0.0, 1.0,
         ]),
在渐变三角形示例中我们只用了一个缓冲区对象(const vertexBuffer = gl.createBuffer();),当然也可以使用两个缓冲区对象来实现相同的效果。核心代码如下:
// 声明第二个缓冲区对象:颜色缓冲区
const vertexColorBuffer = gl.createBuffer();
if (!vertexColorBuffer) {
    console.log('创建缓冲区对象失败');
    return -1;
}
gl.bindBuffer(gl.ARRAY_BUFFER, vertexColorBuffer);
// 颜色数据抽离出来
const colors = new Float32Array([
    1.0, 0.0, 0.0,
    0.0, 1.0, 0.0,
    0.0, 0.0, 1.0,
]);
gl.bufferData(gl.ARRAY_BUFFER, colors, gl.STATIC_DRAW);
const a_Color = gl.getAttribLocation(gl.program, 'a_Color');
if (a_Color < 0) {
    console.log('Failed to get the storage location of a_Color');
    return -1;
}
gl.vertexAttribPointer(a_Color, 3, gl.FLOAT, false, 0, 0);
gl.enableVertexAttribArray(a_Color);
将多个缓冲区合并,代码更简洁。思路:
- 首先将顶点位置和颜色写在一个数组中
- 然后通过 vertexAttribPointer() 来读取不同的信息(顶点位置、颜色)。
请看代码:
const vertices = {
    // 顶点位置和颜色写在一起
    data: new Float32Array([
        0.0,   0.5, 1.0, 0.0, 0.0,
        -0.5, -0.5, 0.0, 1.0, 0.0,
        0.5,  -0.5, 0.0, 0.0, 1.0,
    ]),
    vertexNumber: 3,
    count: 2,
}
// 每个元素所占用的字节数
const FSIZE = data.BYTES_PER_ELEMENT;
// FSIZE * 5 - 指定每个点的字节数
// 0 - 偏移量
gl.vertexAttribPointer(a_Position, count, gl.FLOAT, false, FSIZE * 5, 0);
/*
提取颜色:
3 - 分量数
FSIZE * 2 - 偏移量,从第三个开始
*/
gl.vertexAttribPointer(a_Color, 3, gl.FLOAT, false, FSIZE * 5, FSIZE * 2);
例如提取颜色:每个点总共字节数是 FSIZE * 5,颜色占3个分量,从第三(FSIZE * 2)个数开始读取 3 个分量。
为什么是渐变
我们定义了三个不同颜色的点,绘制出来的三角形为什么却是渐变色彩?

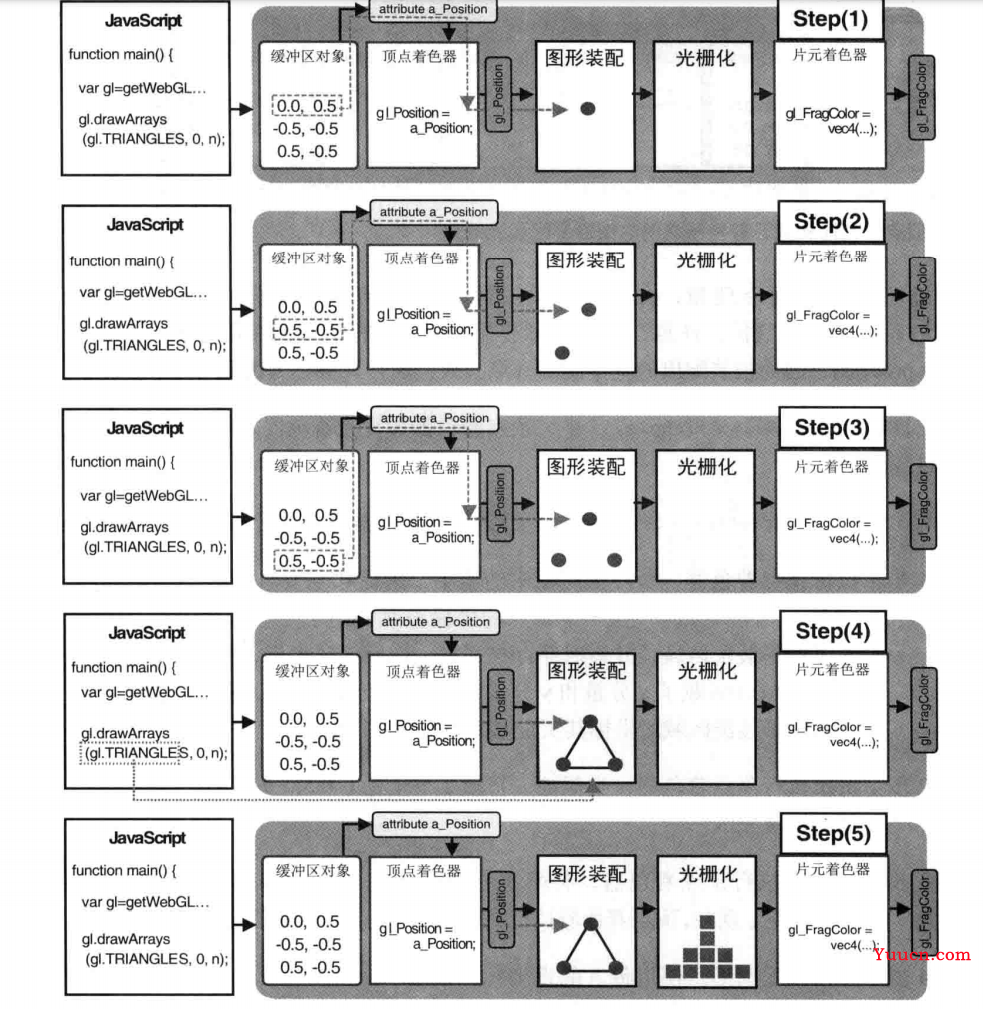
要回答这个问题,需要说一下整个绘制过程。
请看下图:

- 首先确定顶点坐标,我们传了三个顶点
- 接着将孤立的顶点坐标
装配成几何图形。几何图形的类别由 drawArrays() 第一个参数决定 - 将装配好的几何图形转为
片元(简单认为是像素,这里为了示意,只显示了10个片元),这个过程称为光栅化。
图形装配和光栅化过程如下图所示:
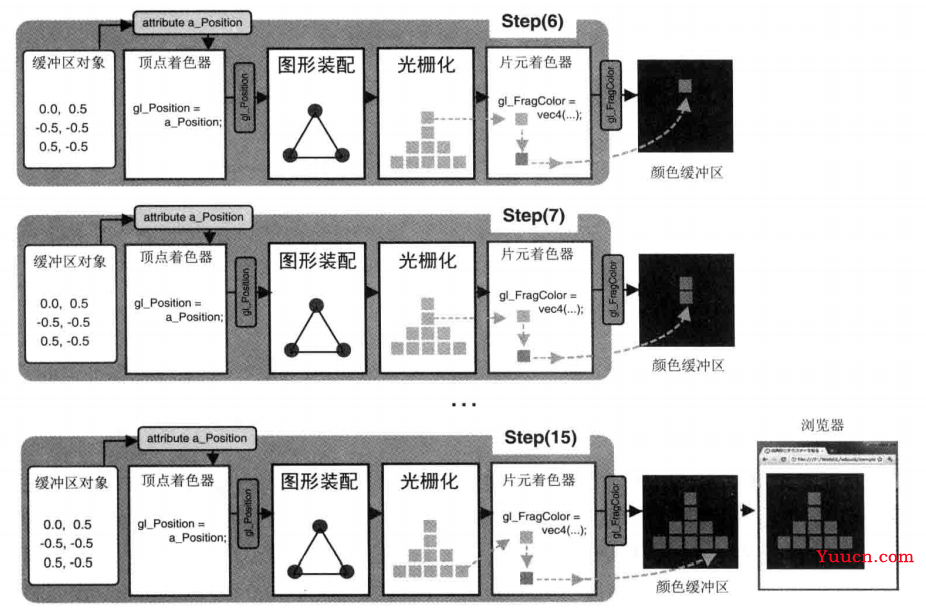
一旦光栅化结束,程序就开始逐片元调用片元着色器。这里调用了10次,每调用一次就处理一个片元。对于每个片元,片元着色器计算出该片元的颜色,并写入颜色缓冲区,当最后一个片元被处理完成,浏览器就会显示最终结果。就像这样:
渐变其实是由 varying 变量的内插导致的。比如绘制一条线,一端是红色,一端是蓝色,我们在顶点着色器向 varying 变量 v_Color 赋上两个颜色,webgl 会计算出线段上所有点(片元)的颜色,并赋值给片元着色器中的 varying 变量 v_Color。就像这样:

顶点着色器中的 v_Color 和片元着色器中的 v_Color 不是一回事。示意如下:

其他章节请看:
webgl 系列