第一章 初识Spring
1.1 Spring简介
-
Spring是一个为简化企业级开发而生的开源框架。
-
Spring是一个IOC(DI)和AOP容器框架。
-
IOC全称:Inversion of Control【控制反转】
- 将对象【万物皆对象】控制权交个Spring
-
DI全称:(Dependency Injection):依赖注入
-
AOP全称:Aspect-Oriented Programming,面向切面编程
-
官网:https://spring.io/
1.2 搭建Spring框架步骤
-
导入jar包
<!--导入spring-context--> <dependency> <groupId>org.springframework</groupId> <artifactId>spring-context</artifactId> <version>5.3.1</version> </dependency> <!--导入junit4.12--> <dependency> <groupId>junit</groupId> <artifactId>junit</artifactId> <version>4.12</version> <scope>test</scope> </dependency> -
编写核心配置文件
-
配置文件名称:applicationContext.xml【beans.xml或spring.xml】
-
配置文件路径:src/main/resources
-
示例代码
<?xml version="1.0" encoding="UTF-8"?>
<beans xmlns="http://www.springframework.org/schema/beans"
       xmlns:xsi="http://www.w3.org/2001/XMLSchema-instance"
       xsi:schemaLocation="http://www.springframework.org/schema/beans http://www.springframework.org/schema/beans/spring-beans.xsd">
    <!-- 将对象装配到IOC容器中-->
    <bean id="stuZhenzhong" class="com.atguigu.spring.pojo.Student">
        <property name="stuId" value="101"></property>
        <property name="stuName" value="zhenzhong"></property>
    </bean>
</beans>
-
-
使用核心类库
@Test
public void testSpring(){
        //使用Spring之前
//        Student student = new Student();
        //使用Spring之后
        //创建容器对象
        ApplicationContext iocObj =
                new ClassPathXmlApplicationContext("applicationContext.xml");
        //通过容器对象,获取需要对象
        Student stuZhenzhong = (Student)iocObj.getBean("stuZhenzhong");
        System.out.println("stuZhenzhong = " + stuZhenzhong);
    }
1.3 Spring特性
- 非侵入式:基于Spring开发的应用中的对象可以不依赖于Spring的API。
- 容器:Spring是一个容器,因为它包含并且管理应用对象的生命周期。
- 组件化:Spring实现了使用简单的组件配置组合成一个复杂的应用。在 Spring 中可以使用XML和Java注解组合这些对象。
- 一站式:在IOC和AOP的基础上可以整合各种企业应用的开源框架和优秀的第三方类库(实际上Spring 自身也提供了表述层的SpringMVC和持久层的JDBCTemplate)。
1.4 Spring中getBean()三种方式
-
getBean(String beanId):通过beanId获取对象
- 不足:需要强制类型转换,不灵活
-
getBean(Class clazz):通过Class方式获取对象
-
不足:容器中有多个相同类型bean的时候,会报如下错误:
expected single matching bean but found 2: stuZhenzhong,stuZhouxu
-
-
getBean(String beanId,Clazz clazz):通过beanId和Class获取对象
- 推荐使用
注意:框架默认都是通过无参构造器,帮助我们创建对象。
所以:如提供对象的构造器时,一定添加无参构造器
1.5 bean标签详解
- 属性
- id:bean的唯一标识
- class:定义bean的类型【class全类名】
- 子标签
- property:为对象中属性赋值【set注入】
- name属性:设置属性名称
- value属性:设置属性数值
- property:为对象中属性赋值【set注入】
day06
第二章 SpringIOC底层实现
IOC:将对象的控制器反转给Spring
2.1 BeanFactory与ApplicationContexet
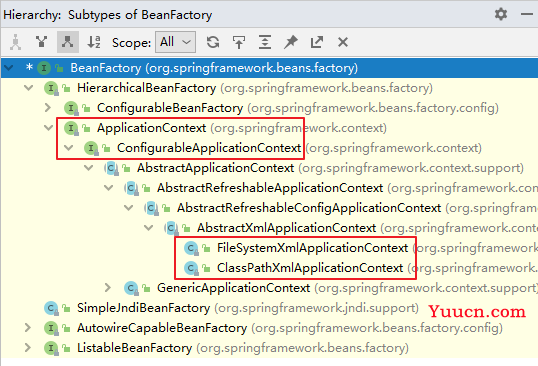
- BeanFactory:IOC容器的基本实现,是Spring内部的使用接口,是面向Spring本身的,不是提供给开发人员使用的。****
- ApplicationContext:BeanFactory的子接口,提供了更多高级特性。面向Spring的使用者,几乎所有场合都使用ApplicationContext而不是底层的BeanFactory。
2.2 图解IOC类的结构

- BeanFactory:Spring底层IOC实现【面向Spring框架】
- ...
-
ApplicationContext:面向程序员
-
ConfigurableApplicationContext:提供关闭或刷新容器对象方法
- ...
- ClassPathXmlApplicationContext:基于类路径检索xml文件
- AnnotationConfigApplicationContext:基于注解创建容器对象
- FileSystemXmlApplicationContext:基于文件系统检索xml文件
- ...
-
ConfigurableApplicationContext:提供关闭或刷新容器对象方法
-
ApplicationContext:面向程序员
- ...
第三章 Spring依赖注入数值问题【重点】
3.1 字面量数值
- 数据类型:基本数据类型及包装类、String
- 语法:value属性或value标签
3.2 CDATA区
- 语法:<![CDATA[]]>
- 作用:在xml中定义特殊字符时,使用CDATA区
3.3 外部已声明bean及级联属性赋值
-
语法:ref
-
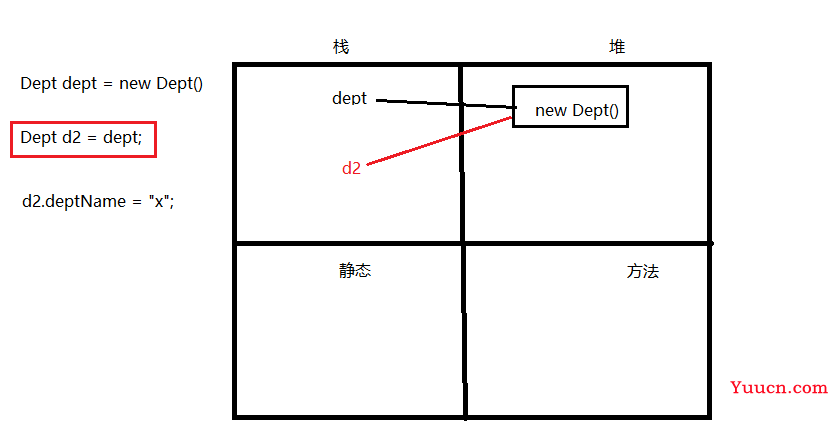
注意:级联属性更改数值会影响外部声明bean【ref赋值的是引用】
-
示例代码
<bean id="dept1" class="com.atguigu.pojo.Dept">
    <property name="deptId" value="1"></property>
    <property name="deptName" value="研发部门"></property>
</bean>
<bean id="empChai" class="com.atguigu.pojo.Employee">
    <property name="id" value="101"></property>
    <property name="lastName" value="chai"></property>
    <property name="email" value="chai@163.com"></property>
    <property name="salary" value="50.5"></property>
    <property name="dept" ref="dept1"></property>
    <property name="dept.deptName" value="财务部门"></property>
</bean>

3.4 内部bean
-
概述
- 内部类:在一个类中完整定义另一个类,当前类称之为内部类
- 内部bean:在一个bean中完整定义另一个bean,当前bean称之为内部bean
-
注意:内部bean不会直接装配到IOC容器中
-
示例代码
<!--    测试内部bean-->
<bean id="empXin" class="com.atguigu.pojo.Employee">
    <property name="id" value="102"></property>
    <property name="lastName" value="xx"></property>
    <property name="email" value="xx@163.com"></property>
    <property name="salary" value="51.5"></property>
    <property name="dept">
        <bean class="com.atguigu.pojo.Dept">
            <property name="deptId" value="2"></property>
            <property name="deptName" value="人事部门"></property>
        </bean>
    </property>
</bean>
3.5 集合
-
List
<!-- 测试集合--> <bean id="dept3" class="com.atguigu.pojo.Dept"> <property name="deptId" value="3"></property> <property name="deptName" value="程序员鼓励师"></property> <property name="empList"> <list> <ref bean="empChai"></ref> <ref bean="empXin"></ref> <!-- <bean></bean>--> </list> </property> </bean> <!-- 测试提取List--> <util:list id="empList"> <ref bean="empChai"></ref> <ref bean="empXin"></ref> </util:list> <bean id="dept4" class="com.atguigu.pojo.Dept"> <property name="deptId" value="4"></property> <property name="deptName" value="运营部门"></property> <property name="empList" ref="empList"></property> </bean> -
Map
<!--    测试Map-->
<bean id="dept5" class="com.atguigu.pojo.Dept">
    <property name="deptId" value="5"></property>
    <property name="deptName" value="采购部门"></property>
    <property name="empMap">
        <map>
            <entry key="101" value-ref="empChai"></entry>
            <entry>
                <key><value>103</value></key>
                <ref bean="empChai"></ref>
            </entry>
            <entry>
                <key><value>102</value></key>
                <ref bean="empXin"></ref>
            </entry>
        </map>
    </property>
</bean>
<util:map id="empMap">
    <entry key="101" value-ref="empChai"></entry>
    <entry>
        <key><value>103</value></key>
        <ref bean="empChai"></ref>
    </entry>
    <entry>
        <key><value>102</value></key>
        <ref bean="empXin"></ref>
    </entry>
</util:map>
<bean id="dept6" class="com.atguigu.pojo.Dept">
    <property name="deptId" value="106"></property>
    <property name="deptName" value="后勤部门"></property>
    <property name="empMap" ref="empMap"></property>
</bean>
第四章 Spring依赖注入方式【基于XML】
为属性赋值方式
- 通过xxxset()方法
- 通过构造器
- 反射
4.1 set注入
- 语法:<property>
4.2 构造器注入
- 语法:<constructor-arg>
4.3 p名称空间注入
导入名称空间:xmlns:p="http://www.springframework.org/schema/p"
-
语法:
-
示例代码
<bean id="stuZhouxu" class="com.atguigu.spring.pojo.Student">
    <property name="stuId" value="102"></property>
    <property name="stuName">
        <value><![CDATA[<<zhouxu>>]]></value>
    </property>
</bean>
<bean id="stuZhiFeng" class="com.atguigu.spring.pojo.Student">
    <constructor-arg name="stuId" value="103"></constructor-arg>
    <constructor-arg name="stuName" value="zhifeng"></constructor-arg>
</bean>
<bean id="stuXiaoxi"
      class="com.atguigu.spring.pojo.Student"
      p:stuId="104"
      p:stuName="xiaoxi"></bean>
第五章 Spring管理第三方bean
5.1 Spring管理druid步骤
-
导入jar包
<!--导入druid的jar包--> <dependency> <groupId>com.alibaba</groupId> <artifactId>druid</artifactId> <version>1.1.10</version> </dependency> <!--导入mysql的jar包--> <dependency> <groupId>mysql</groupId> <artifactId>mysql-connector-java</artifactId> <version>5.1.37</version> <!-- <version>8.0.26</version>--> </dependency> -
编写db.properties配置文件
#key=value db.driverClassName=com.mysql.jdbc.Driver db.url=jdbc:mysql://localhost:3306/db220106 db.username=root db.password=root -
编写applicationContext.xml相关代码
<!-- 加载外部属性文件db.properties--> <context:property-placeholder location="classpath:db.properties"></context:property-placeholder> <!-- 装配数据源--> <bean id="dataSource" class="com.alibaba.druid.pool.DruidDataSource"> <property name="driverClassName" value="${db.driverClassName}"></property> <property name="url" value="${db.url}"></property> <property name="username" value="${db.username}"></property> <property name="password" value="${db.password}"></property> </bean> -
测试
@Test
public void testDruidDataSource() throws Exception{
    //获取容器对象
    ApplicationContext ioc =
            new ClassPathXmlApplicationContext("applicationContext_druid.xml");
    DruidDataSource dataSource = ioc.getBean("dataSource", DruidDataSource.class);
    System.out.println("dataSource = " + dataSource);
    DruidPooledConnection connection = dataSource.getConnection();
    System.out.println("connection = " + connection);
}
第六章 Spring中FactoryBean
6.1 Spring中两种bean
- 一种是普通bean
- 另一种是工厂bean【FactoryBean】
- 作用:如需我们程序员参数到bean的创建时,使用FactoryBean
6.2 FactoryBean使用步骤
- 实现FactoryBean接口
- 重写方法【三个】
- 装配工厂bean
- 测试
package com.atguigu.factory;
import com.atguigu.pojo.Dept;
import org.springframework.beans.factory.FactoryBean;
/**
 * @author Chunsheng Zhang 尚硅谷
 * @create 2022/3/26 14:09
 */
public class MyFactoryBean implements FactoryBean<Dept> {
    /**
     * getObject():参数对象创建的方法
     * @return
     * @throws Exception
     */
    @Override
    public Dept getObject() throws Exception {
        Dept dept = new Dept(101,"研发部门");
        //.....
        return dept;
    }
    /**
     * 设置参数对象Class
     * @return
     */
    @Override
    public Class<?> getObjectType() {
        return Dept.class;
    }
    /**
     * 设置当前对象是否为单例
     * @return
     */
    @Override
    public boolean isSingleton() {
        return true;
    }
}
第七章 Spring中bean的作用域
7.1 语法
- 在bean标签中添加属性:scope属性即可
7.2 四个作用域
- singleton【默认值】:单例【在容器中只有一个对象】
- 对象创建时机:创建容器对象时,创建对象执行
- prototype:多例【在容器中有多个对象】
- 对象创建时机:getBean()方法被调用时,创建对象执行
- request:请求域
- 当前请求有效,离开请求域失效
- 当前请求:URL不变即为当前请求
- session:会话域
- 当前会话有效,离开当前会话失效
- 当前会话:当前浏览不关闭不更换即为当前会话
第八章 Spring中bean的生命周期
8.1 bean的生命周期
① 通过构造器或工厂方法创建bean实例
② 为bean的属性设置值和对其他bean的引用
③ 调用bean的初始化方法
④ bean可以使用了
⑤ 当容器关闭时,调用bean的销毁方法
8.2 bean的后置处理器
-
作用:在调用初始化方法前后对bean进行额外的处理。
-
实现:
- 实现BeanPostProcessor接口
- 重写方法
- postProcessBeforeInitialization(Object, String):在bean的初始化之前执行
- postProcessAfterInitialization(Object, String):在bean的初始化之后执行
- 在容器中装配后置处理器
-
注意:装配后置处理器会为当前容器中每个bean均装配,不能为局部bean装配后置处理器
8.3 添加后置处理器后bean的生命周期
① 通过构造器或工厂方法创建bean实例
② 为bean的属性设置值和对其他bean的引用
postProcessBeforeInitialization(Object, String):在bean的初始化之前执行
③ 调用bean的初始化方法
postProcessAfterInitialization(Object, String):在bean的初始化之后执行
④ bean可以使用了
⑤ 当容器关闭时,调用bean的销毁方法
第九章 Spring中自动装配【基于XML】
9.1 Spring中提供两种装配方式
- 手动装配
- 自动装配
9.2 Spring自动装配语法及规则
-
在bean标签中添加属性:Autowire即可
-
byName:对象中属性名称与容器中的beanId进行匹配,如果属性名与beanId数值一致,则自动装配成功
-
byType:对象中属性类型与容器中class进行匹配,如果唯一匹配则自动装配成功
-
匹配0个:未装配
-
匹配多个,会报错
expected single matching bean but found 2: deptDao,deptDao2
-
-
-
注意:基于XML方式的自动装配,只能装配非字面量数值
9.3 总结
- 基于xml自动装配,底层使用set注入
- 最终:不建议使用byName、byType,建议使用注解方式自动装配
第十章 Spring中注解【非常重要】
10.1 使用注解将对象装配到IOC容器中
约定:约束>配置【注解>XML】>代码
位置:在类上面标识
注意:
- Spring本身不区分四个注解【四个注解本质是一样的@Component】,提供四个注解的目的只有一个:提高代码的可读性
- 只用注解装配对象,默认将类名首字母小写作为beanId
- 可以使用value属性,设置beanId;当注解中只使用一个value属性时,value关键字可省略
-
装配对象四个注解
- @Component:装配普通组件到IOC容器
- @Repository:装配持久化层组件到IOC容器
- @Service:装配业务逻辑层组件到IOC容器
- @Controller:装配控制层|表示层组件到IOC容器
-
使用注解步骤
-
导入相关jar包【已导入】
-
开启组件扫描
<!-- 开启组件扫描 base-package:设置扫描注解包名【当前包及其子包】 --> <context:component-scan base-package="com.atguigu"></context:component-scan> -
使用注解标识组件
-
10.2 使用注解装配对象中属性【自动装配】
-
@Autowired注解
-
作用:自动装配对象中属性
-
装配原理:反射机制
-
装配方式
-
先按照byType进行匹配
-
匹配1个:匹配成功,正常使用
-
匹配0个:
-
默认【@Autowired(required=true)】报错
/*expected at least 1 bean which qualifies as autowire candidate. Dependency annotations: {@org.springframework.beans.factory.annotation.Autowired(required=true)} */ -
@Autowired(required=false),不会报错
-
-
匹配多个
-
再按照byName进行唯一筛选
-
筛选成功【对象中属性名称==beanId】,正常使用
-
筛选失败【对象中属性名称!=beanId】,报如下错误:
//expected single matching bean but found 2: deptDao,deptDao2
-
-
-
-
-
@Autowired中required属性
- true:表示被标识的属性必须装配数值,如未装配,会报错。
- false:表示被标识的属性不必须装配数值,如未装配,不会报错。
-
-
@Qualifier注解
- 作用:配合@Autowired一起使用,将设置beanId名称装配到属性中
- 注意:不能单独使用,需要与@Autowired一起使用
-
@Value注解
- 作用:装配对象中属性【字面量数值】
第十一章 Spring中组件扫描
11.1 默认使用情况
<!--    开启组件扫描
        base-package:设置扫描注解包名【当前包及其子包】
-->
<context:component-scan base-package="com.atguigu"></context:component-scan>
11.2 包含扫描
- 注意:
- 使用包含扫描之前,必须设置use-default-filters="false"【关闭当前包及其子包的扫描】
- type
- annotation:设置被扫描注解的全类名
- assignable:设置被扫描实现类的全类名
<context:component-scan base-package="com.atguigu" use-default-filters="false">
    <context:include-filter type="annotation" 			 expression="org.springframework.stereotype.Repository"/>
    <context:include-filter type="assignable" expression="com.atguigu.service.impl.DeptServiceImpl"/>
</context:component-scan>
11.3 排除扫描
<!--    【排除扫描】   假设:环境中共有100包,不想扫描2/100-->
    <context:component-scan base-package="com.atguigu">
        <context:exclude-filter type="annotation" expression="org.springframework.stereotype.Controller"/>
<!--        <context:exclude-filter type="assignable" expression="com.atguigu.controller.DeptController"/>-->
    </context:component-scan>
第十三章 Spring完全注解开发【0配置】
13.1 完全注解开发步骤
- 创建配置类
- 在class上面添加注解
- @Configuration:标识当前类是一个配置类,作用:代替XML配置文件
- @ComponentScan:设置组件扫描当前包及其子包
- 使用AnnotationConfigApplicationContext容器对象
13.2 示例代码
/**
 * @author Chunsheng Zhang 尚硅谷
 * @create 2022/3/28 14:05
 */
@Configuration
@ComponentScan(basePackages = "com.atguigu")
public class SpringConfig {
}
  @Test
    public void test0Xml(){
        //创建容器对象
//        ApplicationContext context =
//                new ClassPathXmlApplicationContext("applicationContext.xml");
        //使用AnnotationConfigApplicationContext容器对象
        ApplicationContext context =
                new AnnotationConfigApplicationContext(SpringConfig.class);
        DeptDaoImpl deptDao = context.getBean("deptDao", DeptDaoImpl.class);
        System.out.println("deptDao = " + deptDao);
    }
第十四章 Spring集成Junit4
14.1 集成步骤
- 导入jar包
- spring-test-5.3.1.jar
- 指定Spring的配置文件的路径
- 【@ContextConfiguration】
- 指定Spring环境下运行Junit4的运行器
- @RunWith
14.2 示例代码
/**
 * @author Chunsheng Zhang 尚硅谷
 * @create 2022/3/28 14:12
 */
@ContextConfiguration(locations = "classpath:applicationContext.xml")
@RunWith(SpringJUnit4ClassRunner.class)
public class TestSpringJunit4 {
    @Autowired
    private DeptService deptService;
    @Test
    public void testService(){
        //创建容器对象
//        ApplicationContext context =
//                new ClassPathXmlApplicationContext("applicationContext.xml");
//        DeptService deptService = context.getBean("deptService", DeptServiceImpl.class);
        deptService.saveDept(new Dept());
    }
}
第十五章 AOP前奏
15.1 代理模式
-
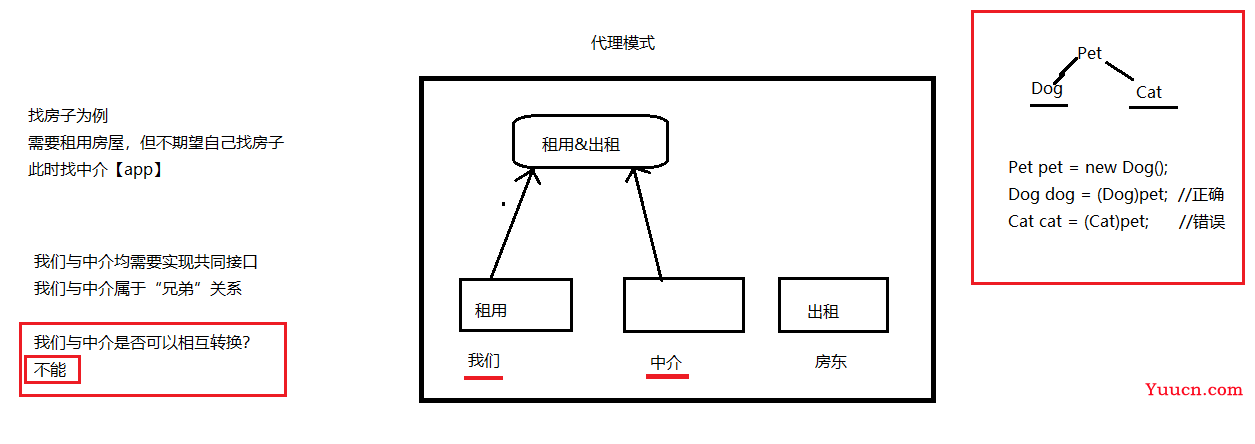
代理模式:我们需要做一件事情,又不期望自己亲力亲为,此时,可以找一个代理【中介】
-
我们【目标对象】与中介【代理对象】不能相互转换,因为是“兄弟”关系

15.2 为什么需要代理【程序中】
-
需求:实现【加减乘除】计算器类
- 在加减乘除方法中,添加日志功能【在计算之前,记录日志。在计算之后,显示结果。】
-
实现后发现问题如下
- 日志代码比较分散,可以提取日志类
- 日志代码比较混乱,日志代码【非核心业务代码】与加减乘除方法【核心业务代码】书写一处
-
总结:在核心业务代码中,需要添加日志功能,但不期望在核心业务代码中书写日志代码。
- 此时:使用代理模式解决问题【先将日志代码横向提取到日志类中,再动态织入回到业务代码中】
15.3 手动实现动态代理环境搭建
-
实现方式
- 基于接口实现动态代理: JDK动态代理
- 基于继承实现动态代理: Cglib、Javassist动态代理
-
实现动态代理关键步骤
- 一个类:Proxy
- 概述:Proxy代理类的基类【类似Object】
- 作用:newProxyInstance():创建代理对象
- 一个接口:InvocationHandler
- 概述:实现【动态织入效果】关键接口
- 作用:invoke(),执行invoke()实现动态织入效果
- 一个类:Proxy
15.4 手动实现动态代理关键步骤
注意:代理对象与实现类【目标对象】是“兄弟”关系,不能相互转换
- 创建类【为了实现创建代理对象工具类】
- 提供属性【目标对象:实现类】
- 提供方法【创建代理对象】
- 提供有参构造器【避免目标对为空】
package com.atguigu.beforeaop;
import java.lang.reflect.InvocationHandler;
import java.lang.reflect.Method;
import java.lang.reflect.Proxy;
/**
 * @author Chunsheng Zhang 尚硅谷
 * @create 2022/3/28 16:22
 */
public class MyProxy {
    /**
     * 目标对象【目标客户】
     */
    private Object target;
    public MyProxy(Object target){
        this.target = target;
    }
    /**
     * 获取目标对象的,代理对象
     * @return
     */
    public Object getProxyObject(){
        Object proxyObj = null;
        /**
            类加载器【ClassLoader loader】,目标对象类加载器
            目标对象实现接口:Class<?>[] interfaces,目标对象实现所有接口
            InvocationHandler h
         */
        ClassLoader classLoader = target.getClass().getClassLoader();
        Class<?>[] interfaces = target.getClass().getInterfaces();
        //创建代理对象
        proxyObj = Proxy.newProxyInstance(classLoader, interfaces, new InvocationHandler() {
            //执行invoke()实现动态织入效果
            @Override
            public Object invoke(Object proxy, Method method, Object[] args) throws Throwable {
                //获取方法名【目标对象】
                String methodName = method.getName();
                //执行目标方法之前,添加日志
                MyLogging.beforeMethod(methodName,args);
                //触发目标对象目标方法
                Object rs = method.invoke(target, args);
                //执行目标方法之后,添加日志
                MyLogging.afterMethod(methodName,rs);
                return rs;
            }
        });
        return proxyObj;
    }
//    class invocationImpl implements InvocationHandler{
//    }
}
@Test
    public void testBeforeAop(){
//        int add = calc.add(1, 2);
//        System.out.println("add = " + add);
        //目标对象
        Calc calc = new CalcImpl();
        //代理工具类
        MyProxy myProxy = new MyProxy(calc);
        //获取代理对象
        Calc calcProxy = (Calc)myProxy.getProxyObject();
        //测试
//        int add = calcProxy.add(1, 2);
        int div = calcProxy.div(2, 1);
    }