如有错误,恳请指出。
文章目录
- 0. 数据集下载
- 1. 标注数据label_2
- 2. 校准数据calib
- 3. 点云数据velodyne
- 4. 图像数据image_2
0. 数据集下载
KITTI数据集的下载地址:https://www.cvlibs.net/datasets/kitti/eval_object.php?obj_benchmark=3d,下载以下四个部分即可:
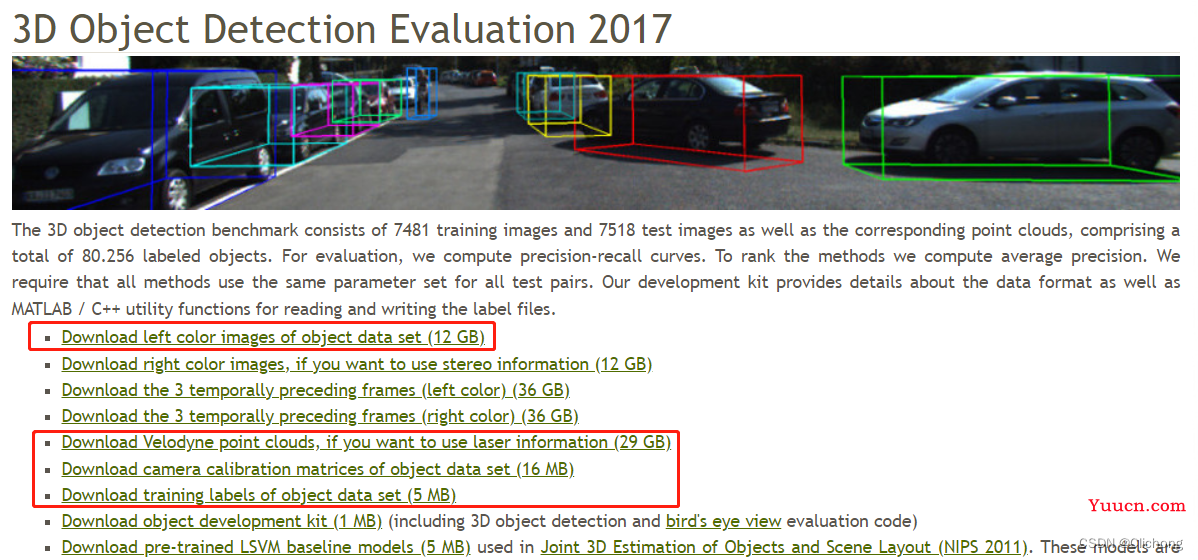
上图红色框标记的为我们需要的数据,分别是彩色图像数据image_2(12GB)、点云数据velodyne(29GB)、相机矫正数据calib(16MB)、标签数据label_2(5MB)。其中彩色图像数据、点云数据、相机矫正数据均包含training(7481)和testing(7518)两个部分,标签数据只有training数据。
KITTI数据下载完成后的目录结构如下所示:测试集没有label_2数据
└── KITTI
       ├── training   <-- training data
       |   ├── image_2
       |   ├── label_2
       |   ├── velodyne
       |   └── calib
       └── testing  <--- testing data
       |   ├── image_2
       |   ├── velodyne
       |   └── calib
1. 标注数据label_2
KITTI数据集中的标注文件以txt格式保存,每个标注文件中包含16个属性,即16列。但我们只能够看到前15列数据,因为第16列是针对测试场景下目标的置信度得分,也可以认为训练场景中得分全部为1但是没有专门标注出来。
下面以KITTI中的"000100.txt"文件为例,包含内容如下所示:
Van 0.63 0 -0.90 0.00 58.65 320.90 374.00 2.46 2.03 5.35 -5.18 1.69 7.24 -1.51
Cyclist 0.00 0 -1.58 684.31 165.66 710.23 242.31 1.82 0.59 1.89 2.13 1.66 18.06 -1.47
Pedestrian 0.00 0 0.84 359.32 182.26 400.32 285.85 1.57 0.52 0.62 -3.63 1.72 11.35 0.54
Car 0.00 2 -2.46 19.88 179.87 206.64 238.00 1.44 1.62 3.91 -13.04 1.64 18.98 -3.05
DontCare -1 -1 -10 650.19 158.35 666.90 192.77 -1 -1 -1 -1000 -1000 -1000 -10
每一行代表一个object,每一行都有16列分别表示不同的含义,具体如下:
-
第1列(字符串):代表物体类别(type)
目标类比别(type),共有8种类别,分别是Car、Van、Truck、Pedestrian、Person_sitting、Cyclist、Tram、Misc或’DontCare。DontCare表示某些区域是有目标的,但是由于一些原因没有做标注,比如距离激光雷达过远。但实际算法可能会检测到该目标,但没有标注,这样会被当作false positive (FP)。这是不合理的。用DontCare标注后,评估时将会自动忽略这个区域的预测结果,相当于没有检测到目标,这样就不会增加FP的数量了。此外,在 2D 与 3D Detection Benchmark 中只针对 Car、Pedestrain、Cyclist 这三类。 -
第2列(浮点数):代表物体是否被截断(truncated)
数值在0(非截断)到1(截断)之间浮动,数字表示指离开图像边界对象的程度。 -
第3列(整数):代表物体是否被遮挡(occluded)
整数0、1、2、3分别表示被遮挡的程度。 -
第4列(弧度数):物体的观察角度(alpha)
取值范围为:-pi ~ pi(单位:rad),是在相机坐标系下,以相机原点为中心,相机原点到物体中心的连线为半径,将物体绕相机y轴旋转至相机z轴,此时物体方向与相机x轴的夹角。这相当于将物体中心旋转到正前方后,计算其与车身方向的夹角。 -
第5~8列(浮点数):物体的2D边界框大小(bbox)
四个数分别是xmin、ymin、xmax、ymax(单位:pixel),表示2维边界框的左上角和右下角的坐标。 - 第9~11列(浮点数):3D物体的尺寸(dimensions)分别是高、宽、长(单位:米)
- 第12-14列(整数):3D物体的位置(location)分别是x、y、z(单位:米),特别注意的是,这里的xyz是在相机坐标系下3D物体的中心点位置。
-
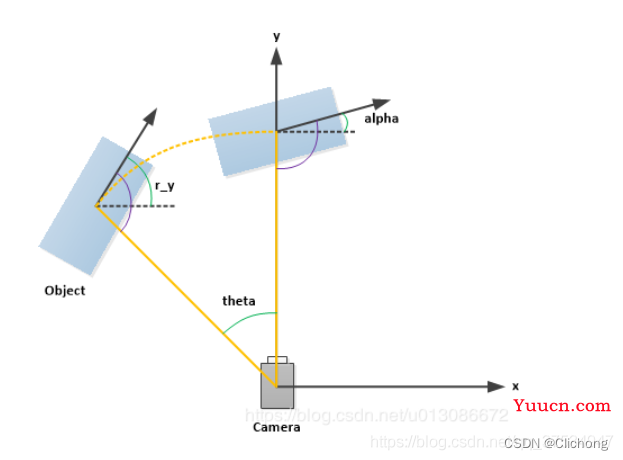
第15列(弧度数):旋转角(rotation_y),取值范围为(-pi, pi)。表示车体朝向,绕相机坐标系y轴的弧度值,即物体前进方向与相机坐标系x轴的夹角。rolation_y与alpha的关系为:alpha=rotation_y - theta,theta为物体中心与车体前进方向上的夹角。alpha的效果是从正前方看目标行驶方向与车身方向的夹角,如果物体不在正前方,那么旋转物体或者坐标系使得能从正前方看到目标,旋转的角度为theta。如下图所示:
关于label文件的理解还可以参考如下代码:
class Object3d(object):
    """ 3d object label """
    def __init__(self, label_file_line):
        data = label_file_line.split(" ")
        data[1:] = [float(x) for x in data[1:]]
        # extract label, truncation, occlusion
        self.type = data[0]  # 'Car', 'Pedestrian', ...
        self.truncation = data[1]  # truncated pixel ratio [0..1]
        self.occlusion = int(data[2])  # 0=visible, 1=partly occluded, 2=fully occluded, 3=unknown
        self.alpha = data[3]  # object observation angle [-pi..pi]
        # extract 2d bounding box in 0-based coordinates
        self.xmin = data[4]  # left
        self.ymin = data[5]  # top
        self.xmax = data[6]  # right
        self.ymax = data[7]  # bottom
        self.box2d = np.array([self.xmin, self.ymin, self.xmax, self.ymax])
        # extract 3d bounding box information
        self.h = data[8]  # box height
        self.w = data[9]  # box width
        self.l = data[10]  # box length (in meters)
        self.t = (data[11], data[12], data[13])  # location (x,y,z) in camera coord.
        self.ry = data[14]  # yaw angle (around Y-axis in camera coordinates) [-pi..pi]
    # 估算困难等级
    def estimate_diffculty(self):
        """ Function that estimate difficulty to detect the object as defined in kitti website"""
        # height of the bounding box
        bb_height = np.abs(self.xmax - self.xmin)
        if bb_height >= 40 and self.occlusion == 0 and self.truncation <= 0.15:
            return "Easy"
        elif bb_height >= 25 and self.occlusion in [0, 1] and self.truncation <= 0.30:
            return "Moderate"
        elif bb_height >= 25 and self.occlusion in [0, 1, 2] and self.truncation <= 0.50:
            return "Hard"
        else:
            return "Unknown"
    # 打印当前标注对象的相关信息
    def print_object(self):
        print('Type, truncation, occlusion, alpha: %s, %d, %d, %f' % \
            (self.type, self.truncation, self.occlusion, self.alpha))
        print('2d bbox (x0,y0,x1,y1): %f, %f, %f, %f' % \
            (self.xmin, self.ymin, self.xmax, self.ymax))
        print('3d bbox h,w,l: %f, %f, %f' % \
            (self.h, self.w, self.l))
        print('3d bbox location, ry: (%f, %f, %f), %f' % \
            (self.t[0],self.t[1],self.t[2],self.ry))
2. 校准数据calib
以训练文件中的000000.txt标定校准文件为例,其内容如下图所示。
P0: 7.070493000000e+02 0.000000000000e+00 6.040814000000e+02 0.000000000000e+00 0.000000000000e+00 7.070493000000e+02 1.805066000000e+02 0.000000000000e+00 0.000000000000e+00 0.000000000000e+00 1.000000000000e+00 0.000000000000e+00
P1: 7.070493000000e+02 0.000000000000e+00 6.040814000000e+02 -3.797842000000e+02 0.000000000000e+00 7.070493000000e+02 1.805066000000e+02 0.000000000000e+00 0.000000000000e+00 0.000000000000e+00 1.000000000000e+00 0.000000000000e+00
P2: 7.070493000000e+02 0.000000000000e+00 6.040814000000e+02 4.575831000000e+01 0.000000000000e+00 7.070493000000e+02 1.805066000000e+02 -3.454157000000e-01 0.000000000000e+00 0.000000000000e+00 1.000000000000e+00 4.981016000000e-03
P3: 7.070493000000e+02 0.000000000000e+00 6.040814000000e+02 -3.341081000000e+02 0.000000000000e+00 7.070493000000e+02 1.805066000000e+02 2.330660000000e+00 0.000000000000e+00 0.000000000000e+00 1.000000000000e+00 3.201153000000e-03
R0_rect: 9.999128000000e-01 1.009263000000e-02 -8.511932000000e-03 -1.012729000000e-02 9.999406000000e-01 -4.037671000000e-03 8.470675000000e-03 4.123522000000e-03 9.999556000000e-01
Tr_velo_to_cam: 6.927964000000e-03 -9.999722000000e-01 -2.757829000000e-03 -2.457729000000e-02 -1.162982000000e-03 2.749836000000e-03 -9.999955000000e-01 -6.127237000000e-02 9.999753000000e-01 6.931141000000e-03 -1.143899000000e-03 -3.321029000000e-01
Tr_imu_to_velo: 9.999976000000e-01 7.553071000000e-04 -2.035826000000e-03 -8.086759000000e-01 -7.854027000000e-04 9.998898000000e-01 -1.482298000000e-02 3.195559000000e-01 2.024406000000e-03 1.482454000000e-02 9.998881000000e-01 -7.997231000000e-01
其中,P0、1、2、3分别代表左边灰度相机、右边灰度相机、左边彩色相机和右边彩色相机。
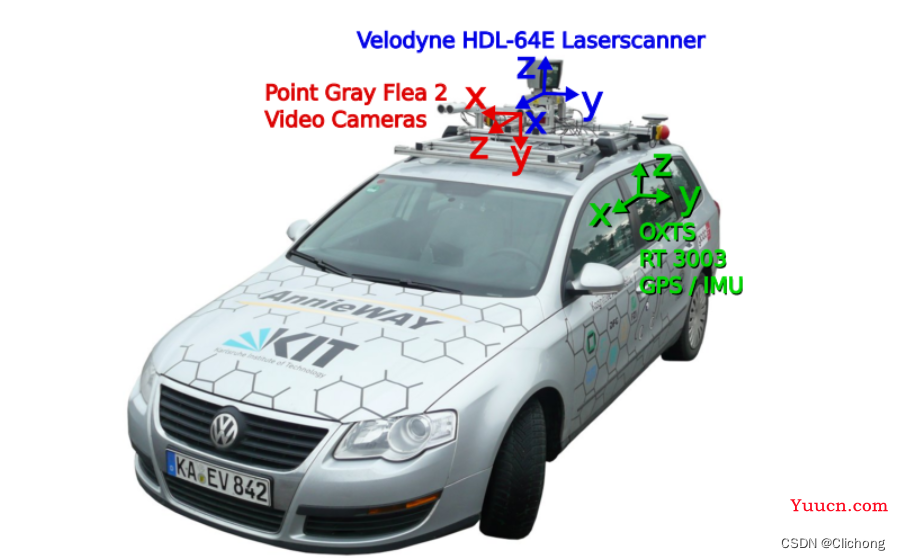
1)内参矩阵
P0-P3分别表示4个相机的内参矩阵,或投影矩阵, 大小为 3x4。相机内参矩阵是为了计算点云空间位置坐标在相机坐标系下的坐标,即把点云坐标投影到相机坐标系。将相机的内参矩阵乘以点云在世界坐标系中的坐标即可得到点云在相机坐标系中的坐标。
如果需要进一步将点云在相机坐标系下的坐标投影到像平面,还需要除以Z值,以及内参矩阵的推导请参考:处理点云数据(五):坐标系的转换
2)外参矩阵
根据上述介绍,我们知道存在三种坐标系世界坐标系、相机坐标系、激光雷达坐标系。世界坐标系反映了物体的真实位置坐标,也是作为相机坐标系和激光雷达坐标系之间相互变换的过渡坐标系。
点云位置坐标投影到相机坐标系前,需要转换到世界坐标系下,对应的矩阵为外参矩阵。外参矩阵为Tr_velo_to_cam ,大小为3x4,包含了旋转矩阵 R 和 平移向量 T。将相机的外参矩阵乘以点云坐标即可得到点云在世界坐标系中的坐标。
3)R0校准矩阵
R0_rect 为0号相机的修正矩阵,大小为3x3,目的是为了使4个相机成像达到共面的效果,保证4个相机光心在同一个xoy平面上。在进行外参矩阵变化之后,需要于R0_rect相乘得到相机坐标系下的坐标。
4)点云坐标到相机坐标
综上所述,点云坐标在相机坐标系中的坐标等于:内参矩阵 * R0校准矩阵 * 外参矩阵 * 点云坐标
即:P * R0_rect *Tr_velo_to_cam * x
例如,要将Velodyne激光雷达坐标系中的点x投影到左侧的彩色图像中y,使用公式:
y = P2 * R0_rect *Tr_velo_to_cam * x
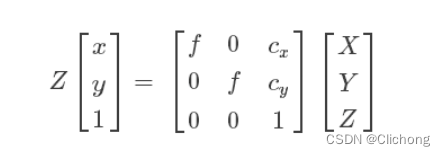
当计算出z<0的时候表明该点在相机的后面 。按照上述过程得到的结果是点云在相机坐标系中的坐标,如果需要将点云坐标投影到像平面还需要除以Z。
因为最后的转换结果如下,详细见参考资料3.
坐标系之间的转换代码:
class Calibration(object):
    def __init__(self, calib_filepath, from_video=False):
        if from_video:
            calibs = self.read_calib_from_video(calib_filepath)
        else:
            calibs = self.read_calib_file(calib_filepath)
        # Projection matrix from rect camera coord to image2 coord
        self.P = calibs["P2"]
        self.P = np.reshape(self.P, [3, 4])
        # Rigid transform from Velodyne coord to reference camera coord
        self.V2C = calibs["Tr_velo_to_cam"]
        self.V2C = np.reshape(self.V2C, [3, 4])
        self.C2V = inverse_rigid_trans(self.V2C)
        # Rotation from reference camera coord to rect camera coord
        self.R0 = calibs["R0_rect"]
        self.R0 = np.reshape(self.R0, [3, 3])
        # Camera intrinsics and extrinsics
        self.c_u = self.P[0, 2]
        self.c_v = self.P[1, 2]
        self.f_u = self.P[0, 0]
        self.f_v = self.P[1, 1]
        self.b_x = self.P[0, 3] / (-self.f_u)  # relative
        self.b_y = self.P[1, 3] / (-self.f_v)
    ......
    def cart2hom(self, pts_3d):
        """ Input: nx3 points in Cartesian
            Oupput: nx4 points in Homogeneous by pending 1
        """
        n = pts_3d.shape[0]
        pts_3d_hom = np.hstack((pts_3d, np.ones((n, 1))))
        return pts_3d_hom
    # ===========================
    # ------- 3d to 3d ----------
    # ===========================
    def project_velo_to_ref(self, pts_3d_velo):
        pts_3d_velo = self.cart2hom(pts_3d_velo)  # nx4
        return np.dot(pts_3d_velo, np.transpose(self.V2C))
    def project_ref_to_velo(self, pts_3d_ref):
        pts_3d_ref = self.cart2hom(pts_3d_ref)  # nx4
        return np.dot(pts_3d_ref, np.transpose(self.C2V))
    def project_rect_to_ref(self, pts_3d_rect):
        """ Input and Output are nx3 points """
        return np.transpose(np.dot(np.linalg.inv(self.R0), np.transpose(pts_3d_rect)))
    def project_ref_to_rect(self, pts_3d_ref):
        """ Input and Output are nx3 points """
        return np.transpose(np.dot(self.R0, np.transpose(pts_3d_ref)))
    def project_rect_to_velo(self, pts_3d_rect):
        """ Input: nx3 points in rect camera coord.
            Output: nx3 points in velodyne coord.
        """
        pts_3d_ref = self.project_rect_to_ref(pts_3d_rect)
        return self.project_ref_to_velo(pts_3d_ref)
    def project_velo_to_rect(self, pts_3d_velo):
        pts_3d_ref = self.project_velo_to_ref(pts_3d_velo)
        return self.project_ref_to_rect(pts_3d_ref)
    # ===========================
    # ------- 3d to 2d ----------
    # ===========================
    def project_rect_to_image(self, pts_3d_rect):
        """ Input: nx3 points in rect camera coord.
            Output: nx2 points in image2 coord.
        """
        pts_3d_rect = self.cart2hom(pts_3d_rect)    # 增加第四列(全为1)
        pts_2d = np.dot(pts_3d_rect, np.transpose(self.P))  # nx3
        pts_2d[:, 0] /= pts_2d[:, 2]    # 如果需要将点云坐标投影到像平面还需要除以Z
        pts_2d[:, 1] /= pts_2d[:, 2]
        return pts_2d[:, 0:2]
    def project_velo_to_image(self, pts_3d_velo):
        """ Input: nx3 points in velodyne coord.
            Output: nx2 points in image2 coord.
        """
        pts_3d_rect = self.project_velo_to_rect(pts_3d_velo)
        return self.project_rect_to_image(pts_3d_rect)
    # ===========================
    # ------- 2d to 3d ----------
    # ===========================
    def project_image_to_rect(self, uv_depth):
        """ Input: nx3 first two channels are uv, 3rd channel
                   is depth in rect camera coord.
            Output: nx3 points in rect camera coord.
        """
        n = uv_depth.shape[0]
        x = ((uv_depth[:, 0] - self.c_u) * uv_depth[:, 2]) / self.f_u + self.b_x
        y = ((uv_depth[:, 1] - self.c_v) * uv_depth[:, 2]) / self.f_v + self.b_y
        pts_3d_rect = np.zeros((n, 3))
        pts_3d_rect[:, 0] = x
        pts_3d_rect[:, 1] = y
        pts_3d_rect[:, 2] = uv_depth[:, 2]
        return pts_3d_rect
    def project_image_to_velo(self, uv_depth):
        pts_3d_rect = self.project_image_to_rect(uv_depth)
        return self.project_rect_to_velo(pts_3d_rect)
    ......
3. 点云数据velodyne
这里KITTI的点云数据是bin文件格式的,在之前的笔记介绍到bin点云文件可以进行如下进行读取:
kitti_file = r'E:\Study\Machine Learning\Dataset3d\kitti\training\velodyne\000100.bin'
points = np.fromfile(file=kitti_file, dtype=np.float32, count=-1).reshape([-1, 4])
bin文件的存储方式是以二进制形式存储,这带来的好处是读写的速度快,精度不丢失。与txt文件相同,其没有文件的描述信息,只包含点云数据,没有文件的说明部分。但是,txt文件按行存储点的信息,而bin则是将全部数据合并为一个序列,也可以理解为一行。也就是说,读取一个bin文件的输出是一个长串的序列信息,一般需要将其reshape一下,每4个数据为一个点云数据,所以需要reshape成N行4列。
简单的,可以通过一下代码对点云进行可视化:
def viz_mayavi(points, vals="distance"):
    x = points[:, 0]  # x position of point
    y = points[:, 1]  # y position of point
    z = points[:, 2]  # z position of point
    fig = mlab.figure(bgcolor=(0, 0, 0), size=(640, 360))
    mlab.points3d(x, y, z,
                  z,       # Values used for Color
                  mode="point",
                  colormap='spectral', # 'bone', 'copper', 'gnuplot'
                  # color=(0, 1, 0),   # Used a fixed (r,g,b) instead
                  figure=fig,
                  )
4. 图像数据image_2
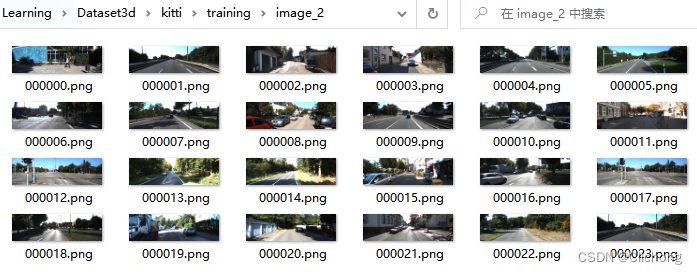
对于这部分数据就没啥可以介绍的,就是存放图像的,可以更具标注文件在图像上对标注框进行展现。
参考资料:
1. 【KITTI】KITTI数据集简介(二) — 标注数据label_2
2. KITTI】KITTI数据集简介(四) — 标定校准数据calib
3. 处理点云数据(五):坐标系的转换
4. kitti可视化github项目:kitti_object_vis
5. kitti数据集在3D目标检测中的入门
6. Open3d系列 | 1. Open3d实现点云数据读写、点云配准、点云法向量计算